Pages

Showing posts with label {Vegetables}. Show all posts

Monday, February 17, 2014

{Spaghetti Squash Shrimp Creole}

 Happy Monday everybody! It is a beautiful day, and even more beautiful because there is no school this week. That means I get to catch up on some homework, prepare for track season, and COOK! 

I have been so inspired by all the 21 Day Sugar Detox and Whole 30 recipes that are circulating the internet. That said, after trying to figure out what to do for dinner with an end-of-the-week refrigerator and a spaghetti squash, I decided on this spicy seafood delicacy. 


This is definitely my new favorite way to eat spaghetti squash. I love all things with tomato, and this is certainly no exception. It is really easy to make, and a delicious creation. I only made enough for myself, but this recipe is easily adjustable to an amount to feed more mouths. Simply increase ratio if cooking this for more than one serving or for making more than one batch.

One of my favorite parts of this recipes it that I have another excuse to use more bone broth. It is so yummy and so good for my health. I have added it as a regular part of my Paleo plus/21DSD/Whole 30 lifestyle. I have seen significant improvement in my health since  following a 21 DSD and Whole 30 diet for about 3 months. I'll admit, I do sometimes eat more fruit than I should- which is still only two servings in a day instead of the usual five servings per week. With so many vegetables and healing recipes, I feel so energized, healthy, and great. This shrimp creole is a new staple in my favorite recipes!

I hope you enjoy this yummy seafood delight!


 {Spaghetti Squash Shrimp Creole}

Serves 1
 Ingredients:
 1/2 spaghetti squash, baked
1 teaspoon coconut oil
1/2 cup green pepper, chopped
1/4 cup celery, chopped
1 garlic clove, minced or pressed
1/2 teaspoon oregano
1/2 teaspoon paprika
1/4 teaspoon homemade taco seasoning

1/2 cup bone broth or chicken broth
4 ounces tomato paste
3 ounces cooked shrimp

Instructions:

1. Begin by baking the spaghetti squash, cut in half and with seeds removed, at 375 F for 35 minutes.
2. While the spaghetti squash is baking, heat coconut oil in a non-stick pan. Add green pepper and celery. Saute until softened, about 5 minute. 
3. Next, add the tomato paste, bone broth, paprika, oregano, taco seasoning, and garlic to the pan, mixing thoroughly. Cover the pan and allow to simmer for 20-30 minutes. If you desire a thinner sauce, add water or more broth. If you like a thicker sauce, add coconut flour, a teaspoon at a time.
4. Remove the baked spaghetti squash from the oven and "spaghetti" it with a fork. Put the spaghetti in the pan, mixing to coat with the sauce.
5.  Finally, add the prepared shrimp and let it all cook together for at least 5 minutes.
6. Serve and enjoy!


Wednesday, January 1, 2014

{Parsley-Basil Kelp Noodles with Broccoli and Chicken}

Happy New Year! I'm starting 2014 off right with a Whole 30/21DSD/AIP combo. NOT a diet, or a detox, but a readjustment. I've found myself snacking on more fruit than I would like, and occasionally drifting to dried fruit when I was hungry and looking for a quick go-to snack. I know, hand-slap! So not only am I doing this combo readjustment to rid myself of sugar, but also to heal my gut. Lately, it has taken a beating with cross-contamination from my family's "un-Sydney-friendly" kitchen and baking, despite drastic efforts. However, as the only one who has severe reactions, I've suffered the brunt og Christmas baking. I mean, if I'm going to feel sick, I'd like to actually eat something good, not just get sick off of cross-contamination!!

Anyway, so far I am enjoying this readjustment because it has sparked a refreshing new creativity in cooking. After only one day, I'm feeling a whole lot better! I'm excited to see how I feel after a month. I'm not really sure what I'll do after a month, but since it is a readjustment, I'm sure I'll continue this lifestyle, with room for some treats here and there. But mostly I'll stick to just eating the good stuff, like my beloved vegetables! :)


This kelp noodle bowl was absolutely delicious! Besides the pesto, it's kind of a loose recipe because I threw in some plain chicken leftover from another time and pre-chopped broccoli from my zoodles and broccoli. Feel free to add lemony chicken, spicy chicken, or other meats for some variety!


There will be plenty of pesto leftover for other days and other recipes. I'm so glad that I found a pesto recipe that is nut-less (because I can't have nuts...) and not chunky. Today for lunch I plan on eating zoodles with pesto! I hope you enjoy this as much as I do!


INGREDIENTS:


1/4 package kelp noodles (about 1 cup)
1/4 cup fresh broccoli, chopped into little florets
 Chicken, however much you like, prepared however you like, and chopped
                * I think I used roughly about 1/4 cup of chicken

For the Parsley-Basil pesto-
1 cup fresh parsley
handful of fresh basil (about a 1/2 cup)
1/4- 1/3 cup olive oil (add more or less depending on how thick/thin you want) 
1 Tablespoon lemon juice
1/4 teaspoon salt
pepper to taste


INSTRUCTIONS:


Boil kelp noodles and chopped broccoli until both are softened, about 10 minutes.

While the kelp noodles are cooking, begin making the pesto. In a food processor, combine the pesto ingredients and process until smooth, adding more oil if needed.

Drain the kelp noodles and broccoli and place in a bowl. Add about a tablespoon of pesto (depending on how much kelp noodles/broccoli you used) to the noodle bowl and stir until evenly coated. Enjoy!!


Saturday, December 28, 2013

{Spaghetti Squash Vegetable Bake}


This new recipe came about because we had squash, vegetables, and chicken, and we needed dinner. Thankfully I discovered a wonderful creation from the end of the week "leftovers" of the cupboard! It was so fun to whip something together and be a bit creative. I am so excited that my little last minute experiment turned out so well.

Spaghetti squash is one of my favorite vegetable staples. I can use it for any meal in almost anyway. I've made spaghetti squash hash-cakes, "spaghetti" and meatballs, and now this bake! As I've mentioned before, I'm going crazy with love for vegetables, so of course I took this opportunity to add as much vegetables as I could. I probably would have added more, but I went a little easy for my not-so-vegetable-loving family :)

Perhaps the greatest achievement of this dish is that my whole family absolutely loved it. Even my papa, who dislikes vegetables ate two helpings! Today for lunch, instead of his favorite taquitos, my dad had some for leftovers! That's like the ultimate compliment when my family gobbles up my creations! :)


This bake is so easy and a true crowd-pleaser for all ages.  Feel free to add in different vegetables. If I had cauliflower, I would have added some "riced" cauliflower for more vegetable goodness. 

May your family fall in love with this vegetable bake as much as mine did! :)

{SPAGHETTI SQUASH VEGETABLE BAKE}


INGREDIENTS:

1 medium spaghetti squash, baked 
1 chicken breast, cooked and chopped to chunks
16 ounce can of crushed tomatoes
6 ounce can tomato paste
1/4 cup vegetable broth
1 cup fresh spinach, washed
1/4 cup broccoli, chopped into small florets
1/4 cup carrots, chopped
4 leaves of fresh basil, chopped
salt and pepper to taste

INSTRUCTIONS:

Heat the oven to 375 F. Wash and cut the spaghetti squash into two halves. Remove the seeds (save the seeds if you want to roast them later!). Once the oven is ready, bake the squash in the oven, face up for 35-40 minutes, depending on the size of your squash.

Meanwhile, as the squash bakes, prepare the chicken either by baking it in the oven or cooking in a skillet. Prepare the vegetables. 

In a large bowl, combine the vegetables, vegetable broth, tomato paste, tomatoes, basil and cooked chicken. Once the spaghetti squash is done, remove the "spaghetti"  with a fork, placing the strands in the large bowl. Mix it all together, making sure everything is evenly incorporated. 

Place everything in a glass 9x13 baking dish, pressing down and evenly spreading out. Bake at 375 F for 35 minutes. 

Serve and enjoy!


Thursday, December 26, 2013

{Zoodles with Homemade Tomato Sauce and Vegetable Meatballs}


Merry Christmas everyone! I know it is a day late, but I got to use my new vegetable spiralizer, so it was Christmas all over again at lunch! I have been saving up my zucchini, secretly hoping I would find the spiralizer under the tree. 


Can I just say, the spiralizer is AWESOME!!! I absolutely love it!! I cannot wait to try it with many different vegetables.  If you don't have one, you should definitely get one. Christmas is only 364 days away.. :)

Anyway, back to my little lunch. One word- DIVINE!! The zoodles were soft to perfect, harking back memories of my pasta days. The fresh basil in the tomato sauce perfectly complimented this Paleo Italian meal. I'm still drooling a bit as I write this. It was so good. I think I may have it for dinner too. And breakfast. And lunch. 

The tomato sauce and vegetable meatballs were really moments of creative genius. I'm usually not that ambitious, just making stuff up  without a framework or some idea of what I am doing, but I saw vegetables and canned tomatoes and went for it!


Since I've been sugar free for about a month, it has been really hard finding tomato sauces without sugar. Even the organic ones have agave syrup! So I decided if I wanted to have something sugar free, I had to make it myself. Homemade pasta sauce is not really that hard, its easy, its sugar free, and it maybe is even less expensive. So If you are looking for a sugar free option for tomato sauce, I suggest making your own.

I have made the vegetable meatballs before for my family over spaghetti squash, but I haven't posted it until now. So sorry! They are truly delicious! 

My inspiration came from a time when I was flipping through our six TV channels (which NEVER happens!) and I saw a cooking show. The chef was teaching a family how to eat gluten free and suggested adding cooked rice to the meat. Of course I thought, instead I can use cauliflower and vegetables and get the same effect with for a Paleo option with more nutrition. 

That was a moment of brilliance, for I get more vegetables (yay!!!) while using less meat at one time. Feel free to add in other vegetables with the carrot and spinach mix, such as kale or zucchini, being sure it grinds well. 

Since only I ate this, I made a single serving. I made the full recipe for the tomato sauce, but only used as much as I desired to coat the zoodles from one zucchini (which was just 1/4 of the whole tomato sauce recipe).  For the meatballs, I only used about 5 carrots, a small handful of spinach, and a spoonful or two of riced cauliflower with just under a 1/8 pound of ground turkey. 

I hope you enjoy this new favorite as much as I do! May your cravings fro pasta be satisfied by this healthier delicious dish!


 INGREDIENTS:

4  Zucchini, spiraled using a spiralizer, or julienne peeler
1 head of broccoli, chopped into florets

For the Homemade Tomato Sauce-

28 ounce can of crushed tomatoes
6 ounce can of tomato paste
1 clove garlic, pressed
3 leaves of fresh basil, washed and chopped
3/4 teaspoon dried oregano
salt and pepper to taste

For the Vegetable Meatballs-
 
1/2 cup spinach
15 baby carrots
1/2 cup riced cauliflower
1 pound ground turkey meat 
3/4 teaspoon dried oregano

INSTRUCTIONS:

Begin by preparing the Homemade Tomato Sauce, placing the crushed tomatoes and tomato paste in a  nonstick skillet. Then, add the garlic and herbs. Cook for about 10 minutes over medium heat, allowing it to simmer. Set aside. 

For the meatballs, using a food processor, grind the carrots and spinach into pieces. In a bowl, combine the turkey, ground carrots and spinach, cauliflower, and oregano. Then, form into meatballs. Place the meatballs in another skillet until thoroughly cooked through. 

While the meatballs cook, prepare the zucchini and broccoli. Then, add the broccoli to the simmering tomato sauce and cover to steam the broccoli. Next, when the meatballs are almost done, add the zucchini to the pan with the tomato sauce, and cover the pan to breifly soften the zucchini.

After one minute, remove the cover from the pan with the tomato sauce and zucchini and add the meatballs. Mix thoughoughly, adding more salt and pepper if desired. 

Serve and enjoy!


Sunday, December 22, 2013

The How-To's: Cauliflower Rice

 I decided to begin a series of "how-to's" to explain the best way for making certain staples in my diet. So join me as I go back to basics and share what I cook up in the kitchen on a regular basis!

I began with my latest favorite, cauliflower rice. This amazing version of the vegetable is great to have on hand throughout the week. I usually make a large batch at the beginning of the week so that I can have it on hand.

I like to add riced cauliflower to many meals to add an extra dose of vegetables and nutrients. Riced cauliflower is simple to make, and when made right, makes a world of difference!

Cauliflower rice can take on almost any variation. Some of my favorites are lettuce wraps with cilantro-lime cauliflower rice and guacamole. Another recent is a tuna salad topped with guacamole and cauliflower rice. Last night, I made vegetable meatballs, and added the extra cauliflower rice I had on hand.


{A Step-by-Step Guide to Make Cauliflower Rice}


Begin by washing the cauliflower and preheating the oven to 400 F. Chop into florets and place evenly on a baking sheet. Bake in the oven for 30 minutes, or until softened.


 Next, using the grater attachment of the food processor, "rice" the cauliflower. This is somewhat tedious, putting in all the baked florets, but well worth the effort.


After the cauliflower is riced, use immediately, or store to use for later. 
Voila! Your cauliflower is properly riced!!


Lettuce Wraps with Cilantro-Lime Cauliflower Rice and Guacamole

Sunday, December 8, 2013

{Vegetable Sweet Potato Tuna Casserole}

I am really loving my vegetables. I have never felt so good or so healthy in my entire life! It's amazing what eating real and nutritious food can do! I've been on a Whole 30-type diet (no sugar except that little bit in the ketchup I sometimes eat) in attempt to make it a lifestyle,  and I can honestly say, I DON'T LIKE SUGAR ANY MORE! Even fruits, I'm not desperately craving! I am so much more content with my vegetables, and actually crave them. Call me crazy, but honestly, I have never loved vegetables so much as I do now!

Seriously, I saw an autoimmune Paleo dessert idea on Pinterest and thought "I like my vegetables more." I don't know if that's beyond weird, but I challenge you to find your inner love for vegetables. Don't feel like you have to go on a vegetable craze like me, or even crave them, but just see what adding more vegetables and wholesome, grown-in-the-ground ingredients can do!

 That said, I attempted a cozy casserole last night because it was stormy. I wanted soup, but we had no vegetable broth, so casserole it was. 


And can I say it was a delicious decision! I ate it all, no shame. It hit the spot on a stormy winter night! I'm definitely adding this to my list of favorites. It has my vegetables- I think next time I'll add more :)

I only used a 1/2 can of tuna because only I ate it, but feel free to multiply ingredients to the desired serving amount. I hope you enjoy this creation as much as I do!

{VEGETABLE SWEET POTATO CASSEROLE}


Ingredients:

1/4 cup light coconut milk
1 teaspoon coconut flour
1 teaspoon dried rosemary or 1/2 Tablespoon fresh rosemary
1 Tablespoon chicken broth

2 tablespoons lemon juice
1/2 of a 6 ounce can of tuna
1/4 cup fresh broccoli, chopped
1/4 cup "riced" cauliflower 
3/4 cup grated sweet potato
salt and pepper to taste

Instructions:

In a pot, whisk together the coconut milk and coconut flour and bring it to a boil. Reduce to a simmer and then add the lemon juice, chicken broth, and rosemary. 

In a bowl, combine the tuna, broccoli, cauliflower, and sweet potato. Pour the coconut milk sauce over and stir until thoroughly incorporated. 

Place in a baking dish (I used two ramekins) and bake at 375 for approximately 25 minutes (depending on the size of you baking dish and casserole).

Remove and serve!

*If you're not a tuna lover, feel free to substitute it with salmon, chicken, turkey, or whatever you want. And feel free to experiment with different vegetables- next time, I' going to try some kale with it :)


Tuesday, November 19, 2013

{Spaghetti Squash Hash-cakes}

Like previously, I've been on a vegetable craze. Seriously, I've never eaten so many vegetables in my life, but I LOVE it and I feel great! 

Breakfast can be a challenge to find exciting ways to eat vegetables. I mean, green smoothies can get old after awhile.. But these spaghetti squash hash-cakes are the perfect vegetable breakfast!


I called these hash-cakes, because they have the texture of hash browns, but are like pancakes. So, voila, hash-cakes :)

 
Infused with the taste of rosemary, these hash-cakes easily please. Even though I bake an entire spaghetti squash, I only use one cup of spaghetti squash per serving. This recipe is great to use if you buy a large spaghetti squash and don't want to use all of it for another recipe, for example "spaghetti" and meatball. 


I serve mine with a little bit of ketchup drizzled over the top. If you're not following an AIP diet, these hash-cakes would go wonderfully with some scrambled eggs, or even a fried egg in the middle of the hash-cakes. However you decide to enjoy these, I hope these hash-cakes leave you satisfied and energized!

{SPAGHETTI SQUASH HASH-CAKES}


Ingredients:

1 spaghetti squash
2 teaspoons coconut flour
2 teaspoons fresh rosemary, chopped
1 teaspoon dried basil
pepper to taste 
coconut oil 

Instructions:

Bake a spaghetti squash at 375 for 40 minutes. When it is done baking, using a fork,

To make one serving of hash-cakes, combine a cup of spaghetti squash with coconut flour and herbs. In a skillet greased with coconut oil, take about 1/4 cup of the spaghetti squash, put it in the pan and smash together until it sticks. Repeat until all the spaghetti squash is cooking in the pan. Cook for about 7 minutes, or until lightly crisped, then flip the hash-cakes and finish cooking for about 5 minutes. Remove from the pan and enjoy!

**If you want to make more than one serving, just increase the amount still using the  1 cup of spaghetti squash to coconut flour/herbs ratio.

**If your spaghetti squash is extra runny and doesn't stick together very well, add more coconut flour. Coconut flour is a drier flour, and easily soaks up extra moisture :)

Saturday, November 16, 2013

{Lemon Herb Chicken Salad with Honey Mustard Dressing}

 As I finish out the cross country season, I've been focusing even more on getting an ample amount of vegetables in my diet. Maybe even more than ample amount. Lately, I have lived and breathed vegetables. 

This new energy for a vegetable-infused diet has sparked some more creativity, some that I hope to share with you all in the coming weeks! I've experimented some vegetable casseroles, green smoothies, and now that the weather has finally turned a tad bit cooler, I've tried my hand at soup-making. 

But so far, this salad is my new favorite of all my creations. The honey dressing is sweet with just enough spicy kick from the red pepper flakes.* I apologize for my lack of photos- I made the salad right after my cross country meet, so I was ravenous and not very picky about the amount of photos. Blame my appetite :)

I hope you enjoy this refreshingly delicious salad as much as I do. May you find a new passion for vegetables :)


{LEMON HERB CHICKEN SALAD WITH HONEY MUSTARD DRESSING}

 Serves 2


For the vegetables:


Wash and chop one head of romaine or red leaf lettuce. Add a handful of washed spinach and kale to the bowl, then set aside.

For the chicken:

1 four ounce chicken breast
1/2 teaspoon dried rosemary
1/2 teaspoon basil
ground pepper


Slice one four ounce breast of chicken into bite sized pieces. Heat coconut oil in a pan and cook the chicken. Season with rosemary, basil, and ground pepper after about five minutes and stir. Finally, add a squeeze of lemon juice over the sizzling chicken.

For the dressing:

3 Tablespoons olive oil
2 Tablespoons white wine vinegar* 
2 Tablespoons spicy brown mustard, or Dijon mustard
2 teaspoons honey 
1 garlic clove, minced
1/4 teaspoon red pepper flakes

Whisk ingredients together, then set aside. 


Assembling  the salad:

Combine the green leaf lettuce, kale and spinach until thoroughly mixed. Sprinkle chicken pieces on top, and finally drizzle a bit of the salad dressing on top (don't worry that there is enough dressing leftover for later salads). Finally, toss the salad. Enjoy!


*For those strictly following the AIP diet, omit the red pepper flakes. 

**As with anything used in the Paleo and AIP kitchen, always make sure you check the ingredients. Some white wine vinegars are derived from corn sources. The one I used comes from grapes, so it is safe. 


Sunday, October 20, 2013

Fresh Herb Pesto Pizza with Lemon Chicken


I honestly miss my days of pizza. Not because I want to be like every other teenager in America, but I sincerely miss our days of make your own pizza. It was such a memorable family occasion, watching my dad make the dough from scratch, designing random shapes with the pizza dough, slathering on way too much cheese and making cheese pockets in the crust, then peeking into the oven every few minutes to watch our creations bake.
  I have now resurrected those days of make your own pizza. It is a little different now because there is no cheese, no yeasted crust, and no chewy crust. But I can honestly say I'll choose this pizza any day over the traditional American pizza, because not only is it way healthier, but I know that my body will benefit from my enjoyment of it. How many people can say that about their pizza?


This yummy, yummy pizza was super easy to make and even more delicious! The lemony twist combined with the freshness of the herbs was a wonderful combination. I thoroughly enjoyed my night of "make your own pizza." I hope you enjoy yours :)


{FRESH HERB PESTO PIZZA WITH LEMON CHICKEN}


INGREDIENTS:

For the crust-

1 cauliflower, chopped into florets
1 clove of garlic, minced


For the chicken-
1 boneless chicken breast, chopped into chunks
3/4 teaspoon dried oregano
3/4 teaspoon dried basil
1 teaspoon lemon juice
hint of lemon zest
salt and pepper to taste


For the pesto- 
2 cups fresh basil
3 Tablespoons olive oil
1/3 cup shredded coconut
1 Tablespoon lemon juice
zest of 1 lemon


INSTRUCTIONS: 

1. Preheat the oven to 350 F
2. Place the chopped cauliflower and garlic into a food processor and grind into a rice-like texture. On a baking sheet lined with parchment paper, form the cauliflower into a "dough" about a 1/2 inch thick, careful to press it together so that it sticks together and holds. Place in the oven for 20 to 25 minutes, or until lightly browned and still fairly moist.
 3. Meanwhile, begin cooking the chicken either on a nonstick skillet or skillet lighhtly greased with coconut oil. Once it starts to brown, add the spices and lemon juice. Remove from heat when it is fully cooked.
 4. As the chicken is cooking, begin making the pesto. Place basil, coconut, olive oil, lemon juice, and lemon zest into  food processor and pulse until it reaches a semi-fine consistency. 
5. Once the cauliflower crust is done, remove from heat and cool for about...
6. Layer the crust with pesto and then sprinkle on the chicken. If you want, feel free to add vegetables, other meats, or whatever you want. It's make your own pizza night!
Enjoy!


Monday, September 2, 2013

{Flaxjacks Revisited: A Zucchini Twist}


As I've entered the cross country season, I've fashioned a high-vegetable, Whole 30 sort of diet to increase my nutrient intake, and hopefully positively affect my racing. Since most of my breakfasts revolve around  a little bit of fruit, I've decided to amp up my flax jacks. I mean, I can't have a green smoothie everyday!


Thus, enter zucchini flax jacks. Using the same basic recipe as my original flax jacks, I included some various variations so you can choose, along with the zucchini addition.


First, I tried blueberry-zucchini flax jacks, increasing the amount of cinnamon by a smidge and adding in a few fresh blueberries from Trader Joes in the batter. After the flax jacks cooked, I sprinkled some more berries on top. Yum-yum, those were good! 


Then I decided to try a fall edition by adding some diced apples to the flax jacks for an apple-cinnamon twist. With 1/4 teaspoon of nutmeg, 1/4 teaspoon more of cinnamon, and about 1/4 cup of diced apples (depending on how apple-y you like your fall flax jacks), this edition was a delicious way to wake up. I mean, apple, cinnamon, and nutmeg are a perfect fall combination, awakening memories of cozy evenings with tea, classic music, and a good book.

Pulled from a previous recipe of orange-banana-zucchini bread, I decided to add in 1/2 teaspoon of orange zest for a citrus zing. It's fun to mix it up!

Feel free to make your own combinations, like cranberry-orange and banana-cinammon  Most of the fun is found in being creative and trying new things, so enjoy the process!


~ZUCCHINI FLAX JACKS~


Ingredients:

1/2 cup coconut flour
1 teaspoon baking soda
 1/2 teaspoon cinnamon
4 flax eggs (see below)
1/4-1/3 cup water, almond milk, or coconut milk

 1/2 cup shredded zucchini

{Flax eggs}
To make the equivalent of one egg, combine one tablespoon of flax meal with three tablespoons of hot water. Stir and set aside for ten minutes.

Instructions:

Combine the coconut flour, baking soda, and cinnamon together in a medium-sized bowl. Add in the flax eggs and stir until everything is thourgoughly mixed. Slowly add in the water and zucchini, stirring at the same time, until the mixture turns to batter.

Pour batter into the skillet in tablespoonfuls over medium-high heat. Cook on the first side for about five minutes, then flip and continue cooking until desired.   


Sunday, September 1, 2013

{Spectacular Spanish "Rice"}

Summer is now over and the college application process has begun! I'm almost done with my first one- actually I am, but honestly pushing "submit" is the most terrifying thing in the world, so I'm avoiding it at all costs. Seriously, I'm having mini panic attacks and arguments in my head!

Now that I'm a senior in high school, I'm transitioning to adulthood, learning about how to live on my own. With that comes learning how to cook on my own, and be creative in an affordable way. As the summer ended, so did my time to cook and experiment, which has also led me to try quick and easy recipes. That said, this recipe is quick, easy, and affordable, not to mention DELICIOUS!

In our household, my family cannot survive a week without at least one Mexican dinner. Before going Paleo plus, I would always have a taco salad and Spanish rice. Then I'd have Spanish rice for lunch the next day. And as a snack. And for lunch. And when it was all gone, I'd wait in anticipation for the next Mexican dinner. That said, when I cut out grains, I was severely jealous, eating my skimpy salad as I savored the smell of that forbidden rice. 

Even as I made dishes with cauliflower "rice," I didn't even think of trying to make a Paleo plus edition of Spanish rice, for it was forcibly pushed out of my memory. Then, as I experimented new veggie recipes and learned my new desire for spice, memories of that delicious dish of old came flooding back and I KNEW I had to see if I could resurrect this old love. 
 

Need I say I was successful?!? O I wasn't sure what to expect, but when I put a steamy spoonful into my mouth, I was almost afraid because it tasted like I remembered. How could cauliflower be made to taste so delicious?!? What made it even better, is it took about ten minutes of actually doing something before it cooks. So as the cauliflower cooked, I was able to do homework (exciting right?). 


Coming up with the "Spanish" part of the dish was complicated. I did not want to spend time making my own salsa, or the money for fresh tomatoes. Instead, I used Trader Joe's Fired Diced Tomatoes because peppers and spices are added for a spicy decadence. If you do not use this option, I recommend using another spicy canned tomato sauce, or adding in some red peppers, a little chili pepper with fresh or canned tomatoes.


This can be served as a side dish, as a snack, or even used as a base for a chicken/vegetable entree. Now its quick, easy,delicious, affordable, economic, and versitle! Can it get any better?!

I hope you come to enjoy this favorite as much as I do! 


~SPANISH RICE~


Ingredients:

Coconut oil
1 can Fire Roasted tomatoes, pureed
6 ounces tomato paste
4 cloves of garlic, pressed or minced
1/2 cup chicken broth
1 cauliflower, chopped into florets

Instructions:

Heat coconut oil in the bottom of a pan on medium high. Grind cauliflower in a large food processor. Pour into the pan and cook until slightly browned, about 10 minutes. Add in garlic and cook until fragrant, about 15 seconds. Slowly add in the pureed tomatoes and tomato paste (be careful- it may splatter). Stir until well-incorporated, then add in the chicken broth. 

Cover the pan, lower temperature to medium, and cook for 35 minutes. When the time is up, stir the cauliflower, and if there is still substantial liquid, cook for about 5 minutes more. 

Serve and enjoy!


Saturday, July 20, 2013

A Sprouting Summer: Meal #3

I'm not ashamed to admit it. Yes, I do miss my pasta days. Yes, I do miss cheese on top of my pasta. But I do not miss throwing up. Or feeling like my guts are going to spill out- sorry for spoiling any appetite you might have had. Therefore, I have avoided pastas like the plague.

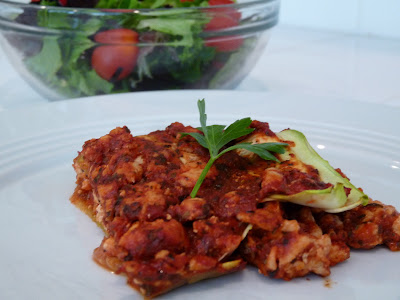
Until now. Enter my new favorite "pasta" dish, zucchini lasagne. Not only is it mouthwateringly tasty, but it is a healthy and super easy delight. 


I adapted this marvelous recipe from quite possibly the most wonderful Paleo cookbook ever,"Make it Paleo," by the Food Lovers. I added my own cooks touch to it, omitting the mushrooms, onions, and adding a few ingredients. Feel free to make your own rendition- it is perfectly capable to be played with and changed. 


I served this with a simple salad. Steamed broccoli, roasted vegetables, or cauliflower rice would also be a nice compliment.


 Zucchini Lasagne

Serves 4
Time: approximately 40 minutes

Ingredients:

1 pound ground turkey
3 garlic cloves, pressed
6 ounces tomato paste
24 ounces tomato sauce (I used Sprouts Tomato Basil- its simple, delicious, and allergy-free!)
2 zucchini, sliced thinly
1 tablespoon fresh parsley
1/2 tablespoon dried basil
1/4 cup fresh basil
1 tablespoon dried oregano
pinch of salt
pepper to taste

Instructions:

Preheat the oven to 325 F. Heat a skillet at medium-high heat. Brown the ground turkey for approximately five minutes. Add in the garlic and saute until aroma arises. 

Stir in the tomato sauce and tomato paste. Add in the parsely, basil, and spices and mix thoroughly. 

Bring the sauce to a light boil, then remove from heat. In a greased 9"x13" baking dish, arrange the first layer of sliced zucchini. Pour about a third of the sauce over the zucchini. Layer with ore zucchini and pour more sauce. Arrange the last layer of zucchini slices and finish off the last of the sauce.

Place the lasagne in the oven for fifteen minutes, covered with foil. After the fifteen minutes, heat the oven to 350 F, and bake for another 15 minutes. Remove and let cool for five minutes, then serve and enjoy.


Saturday, June 22, 2013

A Sprouting Summer: Meal #2

Sometimes, it is easy to become bored with common dishes, such as chicken. Especially in the summertime, chicken seems to never go away. After many barbeque parties, chicken salads, chicken enchiladas, and just plain chicken, many people grow weary of the overused entree. Yet, sometimes, all it takes is a little extra kick or twist to revive weary eaters from the chicken blues. 

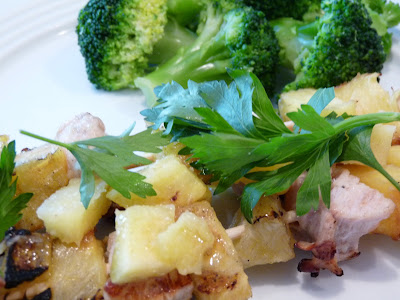
There's nothing like fresh, sweet pineapple in summer time!  Rather than placing the pineapple as a side, it was used in the dish to spice up the common grilled chicken. Combining with the tartness of the ginger-pineapple and the sweetness from the pineapple chunks made this classic summer dish a spectacular hit.


Pineapple Chicken Skewers w/ Roasted Broccoli

Serves 3
Total Time: approximately 30 minutes

For the chicken:

Ingredients-

1 cup fresh pineapple, diced
1/4 cup olive oil
3 cloves of garlic, minced
1 tbsp fresh ginger, grated
1 lemon
pinch of salt
3 chicken breasts, cut into chunks
3 cups pineapple chunks

Directions- 
 Preheat the grill to medium to high heat.
 For the pineapple glaze, combine the diced pineapple, olive oil, garlic, juice from the lemon, and salt in a small bowl. Puree in a food processor, and set aside. 
 Skewer the chicken and pineapple chunks, alternating each time. Cook the skewers on the grill for approximately 15 minutes, occasionally brushing the pineapple glaze on the chicken  skewers.
Remove from grill and serve.

 * ON the grill- lightly brush sauce over the chicken

For the Broccoli:

Preheat oven to 400 F.
Chop one head of broccoli into chunks. Place on baking sheet and drizzle with olive oil. Sprinkle salt and pepper for taste.
Place the broccoli in the oven, and roast for 30 minutes, turning the broccoli halfway through. 
Serve with the chicken.