Pages

Showing posts with label {A Sprouting Summer}. Show all posts

Monday, September 2, 2013

{Flaxjacks Revisited: A Zucchini Twist}


As I've entered the cross country season, I've fashioned a high-vegetable, Whole 30 sort of diet to increase my nutrient intake, and hopefully positively affect my racing. Since most of my breakfasts revolve around  a little bit of fruit, I've decided to amp up my flax jacks. I mean, I can't have a green smoothie everyday!


Thus, enter zucchini flax jacks. Using the same basic recipe as my original flax jacks, I included some various variations so you can choose, along with the zucchini addition.


First, I tried blueberry-zucchini flax jacks, increasing the amount of cinnamon by a smidge and adding in a few fresh blueberries from Trader Joes in the batter. After the flax jacks cooked, I sprinkled some more berries on top. Yum-yum, those were good! 


Then I decided to try a fall edition by adding some diced apples to the flax jacks for an apple-cinnamon twist. With 1/4 teaspoon of nutmeg, 1/4 teaspoon more of cinnamon, and about 1/4 cup of diced apples (depending on how apple-y you like your fall flax jacks), this edition was a delicious way to wake up. I mean, apple, cinnamon, and nutmeg are a perfect fall combination, awakening memories of cozy evenings with tea, classic music, and a good book.

Pulled from a previous recipe of orange-banana-zucchini bread, I decided to add in 1/2 teaspoon of orange zest for a citrus zing. It's fun to mix it up!

Feel free to make your own combinations, like cranberry-orange and banana-cinammon  Most of the fun is found in being creative and trying new things, so enjoy the process!


~ZUCCHINI FLAX JACKS~


Ingredients:

1/2 cup coconut flour
1 teaspoon baking soda
 1/2 teaspoon cinnamon
4 flax eggs (see below)
1/4-1/3 cup water, almond milk, or coconut milk

 1/2 cup shredded zucchini

{Flax eggs}
To make the equivalent of one egg, combine one tablespoon of flax meal with three tablespoons of hot water. Stir and set aside for ten minutes.

Instructions:

Combine the coconut flour, baking soda, and cinnamon together in a medium-sized bowl. Add in the flax eggs and stir until everything is thourgoughly mixed. Slowly add in the water and zucchini, stirring at the same time, until the mixture turns to batter.

Pour batter into the skillet in tablespoonfuls over medium-high heat. Cook on the first side for about five minutes, then flip and continue cooking until desired.   


Saturday, August 3, 2013

{Cinnamon Apple Bread}

I'm so glad I am finally posting this. This is BY FAR my best creation yet. It has taken me months to perfect, but it is so worth it! Presenting, the most delicious cinnamon apple bread in the world:


This thing gets gobbled up in our house! My mom makes french toast, my dad eats it as toast, and my brother, well, he just eats it. Seriously, I just made it yesterday, and it is already half-gone! I guarantee by tonight, there will be one piece left.


In order to get this bread looking as marvelous as it tastes, it was quite a journey! When I first started making this bread, it would have a marvelous rise in the oven, then completely collapse, making for a very dense bread. It still tasted good, but it wasn't what I wanted it to be. So I experimented with it cooling on its side, reducing the liquid,  reducing the oven temperature, even experimenting the differences between mixing it in a food processor and a standard mixing bowl.

Don't be disappointed if your first attempt at this causes you to end up with falling bread. It has taken me many tries, but it is so worth it. And I promise, whether it looks lovely or not, this bread will impress your taste buds! Enjoy!!


**Make sure to read through the instructions a few times before you start. It may seem tedious, but it may mean the difference between fallen bread and true, fluffy bread.

{CINNAMON APPLE BREAD}

Ingredients:
 
2 cups almond flour 
1/2 cup potato starch
1/2 cup tapioca starch
1/2 cup granulated sugar
1 Tablespoon xanthan gum
3/4 teaspoon salt

2 teaspoons sugar
2 1/4 teaspoons active dry yeast
1/2 cup hot water (110 F) 

1/2 cup warm almond milk (110 F)
3 eggs
3 Tablespoons olive oil

1/2 of a large apple, diced
1/4 cup brown sugar
3/4 teaspoon cinnamon


Instructions:

Here's how I've found the most success: 

1. Preheat the oven to 325 F.  Place the almond flour in the food processor and grind about 15 seconds in order to break up clumps. Mix all the dry ingredients in a large food processor and pulse for a few seconds.

2. Dice 1/2 of the apple, then add it to the sugar and cinnamon mixture.

3. Next,  mix the yeast, sugar, and hot water in a small bowl. Mix it up gently, place a towel over the bowl, then place it in a warm and disclosed place and set a timer for 10 minutes. 
 
4. While waiting for the yeast, heat up the milk, bring eggs to room temperature (put them in a bowl with hot water). 

5. When there is about 30 seconds left for the yeast, mix in the warm milk, eggs, and oil. Then pour the yeast into the food processor and  mix for one minute, until a dough forms. 

6. Gently pour the bread into the loaf pan, then gingerly fold in the apple mixture. 

7.   Bake for  50 minutes, or until done (to test with a toothpick, poke it in the center of the bread. If the tooth pick is clean, it its done. If it has dough on it, set the timer for another 5 minutes and check again). 

ENJOY!!!!!!! :)


Thursday, July 25, 2013

{Pancakes Revisted: Flax-Jacks}


For a long time, I've struggled to find delicious breakfast recipes. I mean, who wants to eat leftovers, salmon, or even roasted vegetables for breakfast?  I never really ate sugar cereals before, but I like my breakfast to be special, unlike lunch or dinner. When my family has pancakes, oatmeal, or french toast, I don't want to have leftovers! And after a while, turkey bacon can get pretty boring! Additionally, it is not healthy to eat something over and over again, especially if you have an autoimmune disorder, for your body can "tag" that food, then attack it (and make you feel quite awful!)


So, I set out to create a Paleo and egg free breakfast item. Since I've also cut out eggs from my diet due to hypersensitivity, I needed a good staple beyond turkey bacon and fruit. Thus, I created flax-jacks :)

Previously, I had created a pancake recipe modified from another blog. Yet, when I was faced with cutting out eggs, it took me many tries to make these puppies. First, I had to master making a "flax egg." Since there is no egg to cook and harden the flax-jack together, it was a bit difficult in the beginning to make a cake instead of a bunch of crumbs. 


But I did it! My experiments worked! And can I say, it was so worth it! Chewy, delicious, and almost like the pancakes my mother used to make. Don't be intimidated by their flaxy look- I promise, they are delicious! I'm very sensitive to textures and won't eat a oddly-textured food item, but these passed the test. 


Feel free to cut the recipe by one-fourth for a single serving.  Feel free to make your own creations!! Add in some cocoa powder for a chocolate twist, or some orange zest for a citrus day.
This morning, I added fresh blueberries and chia seeds in mine. I've also mashed up a half an banana (for a single serving) and added it to the batter- it tends to make the flax-jacks thicker, and adds more texture.


Flax-Jacks

 Ingredients:

1/2 cup coconut flour
1 teaspoon baking soda
 1/2 teaspoon cinnamon
4 flax eggs (see below)
1/4- 1/3 cup water, almond milk, or coconut milk

{Flax eggs}
To make the equivalent of one egg, combine one tablespoon of flax meal with three tablespoons of hot water. Stir and set aside for ten minutes.

Instructions:

Combine the coconut flour, baking soda, and cinnamon together in a medium-sized bowl. Add in the flax eggs and stir until everything is thourgoughly mixed. Slowly add in the water, stirring at the same time, until the mixture turns to batter*

Pour batter into the skillet in tablespoonfuls over medium-high heat. Cook on the first side for about  five minutes, then flip and continue cooking until desired. 


* There is a fine balance between too watery and just right. For thicker pancakes, use less water. For thinner, use up to a 1/2 cup. I tend to use water, because my body cannot tolerate almonds at the moment. It may seem like you're putting in a lot of liquid, but coconut flour is very dry, so it requires lots of liquid to balance it out, much less make a batter-like substance. Don't worry- your first time may not be perfect, but they are SO worth it :) 


Wednesday, July 24, 2013

The Best {and Most Dangerous} Granola Bars EVER!


Sometimes, I just want a snack. And sometimes I'm tired of an apple. And sometimes I want something a little sweet. And sometimes I have time and I make this, and I am satisfied. 


 I came across a variation of this recipe on bakergal.com,  and HAD to try it! I changed it up a bit to fit my tastes (so of course, I took out A LOT of coconut!) and came up with this. I hope you enjoy it as much as I do. Your sweet tooth can thank me later. 


I think what impressed me most about this creation is that it really did make granola bars. Some other recipes I've come across claim to make granola bars, yet end up being over-sized granola chunks. I tried and re-tried those recipes over and over. I baked them longer,  I added more liquid, I mixed more thoroughly, but all I ended up with was too much granola.  But this granola really does make granola bars!! Little did I know the trick was in such a simple appliance- the refrigerator!

And its so versatile, it can be made into granola chunks too for coconut yogurt, a smaller snack, or whatever you want.  Feel free to make a 1/4, 1/2, or  double recipe. It is so easy!

Disclaimer: This contains a lot of sugar, especially if you add in more dried fruit. Though it has lots of nuts, coconut, and seeds, it still can cause an unhealthy blood sugar swing. If you have a low tolerance to sugar (like me), I'd make a smaller batch and eat in small chunks.


~The Best Granola Bars Ever!!!~

Ingredients:
1 3/4 cups almonds
3/4 cups sunflower seeds
2 Tablespoons chia seeds
1/2 cup dried blueberries
1/2 cup dried cranberries
1 cup unsweetened shredded coconut flakes

1/3 cup honey or syrup {I tried it both ways successfully. Feel free to mix it up!}
1/2 cup coconut oil
1/2 teaspoon cinnamon
pinch of salt

Instructions:

Mix the dried fruit, coconut, and chia seeds in a medium bowl. Chop almonds into small, bite-sized pieces. Place 1/4 cup of the almonds in with the fruit, and place the remaining nuts into a food processor with the sunflower seeds. Grind the almonds and seeds until they reach the consistency of coarse meal. Mix in with the rest of the dry ingredients and set aside.

Place the honey or syrup with the coconut oil. cinnamon, and salt in a small saucepan, and bring to a low boil. Remove from heat immediately, and pour over the fruit and nut mixture. Mix thoroughly with a spatula until it cools off enough to use your hands to incorporate better. 

Place the granola in a greased 9"x13" baking dish. Press down firmly {this part is really important, for if you don't press hard enough, the granola bars won't be "bar-y"}. Set the granola in the refrigerator for at least an hour, then cut into desired size.


To store, if you want to keep them as bars, leave them in an airtight container, or in the baking dish covered with cling wrap. If you're ok with granola chunks, simply place granola in an airtight container at room temperature.

*Feel free to change it up and make it your favorite way. Add flaxseeds, raisins, cashewJust make sure to keep the ratios of nuts:berries:liquid the same, otherwise they won't be bars!

Tuesday, July 23, 2013

A Breakfast Flashback: Cocomeal


 I know, I know- why make  "faux"meal in the middle of summer? Well, I was getting tired of smoothies and turkey bacon, so I thought I'd try my hand at something different.

Honestly, one food item that I miss most, besides my mom's DELICIOUS ooey-gooey cinnamon rolls made every Christmas, is oatmeal. I miss waking up on a rainy day to a steamy bowl of oatmeal with raisins, and sometimes, brown sugar. But those days are over, but sometimes I just want to relive the past. So, I did- sort of. This time with coconut. 


If you would have told me even a year ago, that basically everything I would eat would be coconut based, I probably would have laughed. Laughed and then stuck my tongue out in a "that's yucky" face. I used to hate coconut with a passion. Seriously, I would not touch anything that came within fifty feet of coconut or coconut smell. I even hated coconut lotion. But now, I absolutely love coconut! Granted, I'll probably never drink coconut milk by itself, but I am impressed with how much coconut I can tolerate.

  That said, if you hate coconut, DO NOT MAKE THIS BREAKFAST ITEM! Coconut is the nuts, bolts, and framework to this delicious creation. 


Needless to say, not only was I amazed that I ate all of it, but that I made it the next day. This simple meal caught me by surprise! It tastes even better with fresh fruit, and can easily be transformed into different variations. I added some fresh nectarine and sprinkled more chia seeds in it. The next day, I added some applesauce, cinnamon, and blueberries for a cinnamon-apple-blueberry creation. It was delicious! Feel free to add in more nuts, fruit variaties, seeds, etc. Make it your cocomeal!

~COCOMEAL~

Ingredients:

1 Tablespoon shredded, unsweetened coconut
1/3 cup light coconut milk
1/2 cup water
1 Tablespoon coconut flour
1 teaspoon chia seeds

Directions: 

Toast shredded coconut by heating a sauce pan over medium- high heat on the stovetop. Be careful, because they burn easily and quickly. 

Next, stir in the water and coconut milk. Cover and bring to a light boil. Once it has reached a boil, add in the coconut flour and cook for about three minutes until it thickens. 

Finally add in the chia seeds and "extras" {flax seeds, applesauce,apples, etc.

**If you want it a little thicker, I've found that removing it from heat and allowing it to set about 5-10 minutes is a good technique. 


Variations:

For apple cinnamon, add 1/4  teaspoon more of cinnamon, 1/4 teaspoon of nutmeg, 2 teaspoons of applesauce (add the applesauce when you add in, and some chopped apples for an added punch.

For cinnamon blueberry, add fresh blueberries on top, and even a squeeze of fresh lemon juice. 

For orange-banana, add 1/2 tsp of orange zest and 1/2 of a banana, chopped.


Saturday, July 20, 2013

A Sprouting Summer: Meal #3

I'm not ashamed to admit it. Yes, I do miss my pasta days. Yes, I do miss cheese on top of my pasta. But I do not miss throwing up. Or feeling like my guts are going to spill out- sorry for spoiling any appetite you might have had. Therefore, I have avoided pastas like the plague.

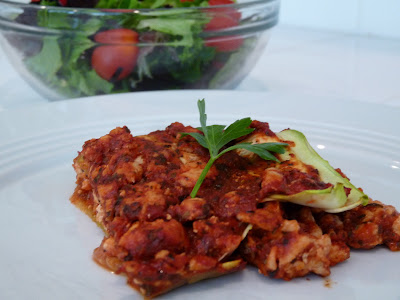
Until now. Enter my new favorite "pasta" dish, zucchini lasagne. Not only is it mouthwateringly tasty, but it is a healthy and super easy delight. 


I adapted this marvelous recipe from quite possibly the most wonderful Paleo cookbook ever,"Make it Paleo," by the Food Lovers. I added my own cooks touch to it, omitting the mushrooms, onions, and adding a few ingredients. Feel free to make your own rendition- it is perfectly capable to be played with and changed. 


I served this with a simple salad. Steamed broccoli, roasted vegetables, or cauliflower rice would also be a nice compliment.


 Zucchini Lasagne

Serves 4
Time: approximately 40 minutes

Ingredients:

1 pound ground turkey
3 garlic cloves, pressed
6 ounces tomato paste
24 ounces tomato sauce (I used Sprouts Tomato Basil- its simple, delicious, and allergy-free!)
2 zucchini, sliced thinly
1 tablespoon fresh parsley
1/2 tablespoon dried basil
1/4 cup fresh basil
1 tablespoon dried oregano
pinch of salt
pepper to taste

Instructions:

Preheat the oven to 325 F. Heat a skillet at medium-high heat. Brown the ground turkey for approximately five minutes. Add in the garlic and saute until aroma arises. 

Stir in the tomato sauce and tomato paste. Add in the parsely, basil, and spices and mix thoroughly. 

Bring the sauce to a light boil, then remove from heat. In a greased 9"x13" baking dish, arrange the first layer of sliced zucchini. Pour about a third of the sauce over the zucchini. Layer with ore zucchini and pour more sauce. Arrange the last layer of zucchini slices and finish off the last of the sauce.

Place the lasagne in the oven for fifteen minutes, covered with foil. After the fifteen minutes, heat the oven to 350 F, and bake for another 15 minutes. Remove and let cool for five minutes, then serve and enjoy.


Saturday, June 22, 2013

A Sprouting Summer: Meal #2

Sometimes, it is easy to become bored with common dishes, such as chicken. Especially in the summertime, chicken seems to never go away. After many barbeque parties, chicken salads, chicken enchiladas, and just plain chicken, many people grow weary of the overused entree. Yet, sometimes, all it takes is a little extra kick or twist to revive weary eaters from the chicken blues. 

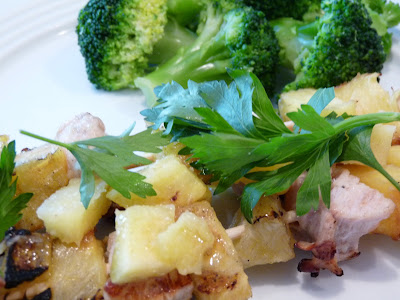
There's nothing like fresh, sweet pineapple in summer time!  Rather than placing the pineapple as a side, it was used in the dish to spice up the common grilled chicken. Combining with the tartness of the ginger-pineapple and the sweetness from the pineapple chunks made this classic summer dish a spectacular hit.


Pineapple Chicken Skewers w/ Roasted Broccoli

Serves 3
Total Time: approximately 30 minutes

For the chicken:

Ingredients-

1 cup fresh pineapple, diced
1/4 cup olive oil
3 cloves of garlic, minced
1 tbsp fresh ginger, grated
1 lemon
pinch of salt
3 chicken breasts, cut into chunks
3 cups pineapple chunks

Directions- 
 Preheat the grill to medium to high heat.
 For the pineapple glaze, combine the diced pineapple, olive oil, garlic, juice from the lemon, and salt in a small bowl. Puree in a food processor, and set aside. 
 Skewer the chicken and pineapple chunks, alternating each time. Cook the skewers on the grill for approximately 15 minutes, occasionally brushing the pineapple glaze on the chicken  skewers.
Remove from grill and serve.

 * ON the grill- lightly brush sauce over the chicken

For the Broccoli:

Preheat oven to 400 F.
Chop one head of broccoli into chunks. Place on baking sheet and drizzle with olive oil. Sprinkle salt and pepper for taste.
Place the broccoli in the oven, and roast for 30 minutes, turning the broccoli halfway through. 
Serve with the chicken.


Saturday, June 15, 2013

A Sprouting Summer- Mint Chip "Ice Cream"

 Since it is summer, many Paleo and allergy-free people alike dread the hot days without the comfort of ice cream, frozen yogurt, berry pies, and such. For us, we resolve to our frozen mangoes and cool cucumbers for a summer treat. But no longer do we have to watch in disdain as our friends eat that frozen temptation, for here is one of the most spectacular things I have ever made: ALLERGY- FRIENDLY MINT CHIP ICE CREAM!! With the main ingredient as hemp seed, you may be thinking, Ha! this isn't ice cream. How do you get creamy deliciousness from a small hippie delicacy? Yes, it sounds strange, but the taste and texture are enough to knock the socks off of any skeptics' feet.


This is seriously the best ice cream EVER! Even better than the sugar-filled, dairy, real-deal stuff. I'm not exaggerating. It is so addicting! I had some after dinner last night. An added bonus to this recipe- its SUPER DUPER easy!!! Literally, just blend hemp seeds, add coconut milk, honey, peppermint extract, chocolate chips, blend some more, and stick it in an ice cream maker. It's that simple!

With enough allergies and sensitivities to cause someone a headache, I often have a hard time finding staples, such as chocolate. However, Enjoy Life produces some amazing chocolate chips, along with chocolate bars. With a slogan that boasts that their products are "free of the top 8 allergens," these Enjoy Life products are enough to make someone like me jump for joy. And might I add, the chocolate chips are delicious. Since this ice cream recipe only requires 1/4 cup of the chocolate chips, use the rest to make cookies, top the ice cream, or better yet, eat by themselves! :) 

Hemp seeds, since they are usually associated with clothing material for hippies and hipsters alike, can be an odd thing to eat with that in mind. However, despite their tattered past, these seeds are health bombshells, packed with essential fatty acids, including healthful omega-6. With a nutrient- packed seed like this in your frozen treat, you can now have your ice cream and eat it too!


{The Most Wonderful Mint Chocolate Chip Ice Cream}


Ingredients:
1/2 cup hemp seeds
1 can or 13 ounces of coconut milk
1/3 cup honey
1 teaspoon peppermint extract
1 Tablespoon allergy freindly vanilla extract*
1/4 cup chocolate chips

Directions:

Blend hemp seeds for 30 seconds in a blender. Add coconut milk, honey, and extract(s), and chocolate chips until the chips are broken into pieces. Add the liquid to the ice cream maker and follow manufacturer instructions. 


ENJOY!


* A note on vanilla extract: I've yet to find a vanilla that either doesn't derive its "vanilla" from corn or chooses to outline all of its ingredients. Though vanilla extract seems harmless, its mysteries could prove to be devestating to the unsuspecting eater. Therefore, your best bet, if you are trying to stay away from allergens, is to either make your own extract, or omit it all together (I often choose the latter).

Tuesday, June 4, 2013

A Sprouting Summer: Meal #1

With school over and the weather warming, SUMMER IS OFFICIALLY HERE!!! But summer is not all rest and relaxation, for I have many things to accomplish!  One of my goals this summer is to cook at least once a week for my family. As the only Paleo eater in a family of four, I find myself often cooking  for myself, but by the third day of leftovers, my creation gets old. Now that I can cook for the family, I'll be able to create and experiment more, at their expense Thus, I'm calling this period of intensive cooking  "A Sprouting Summer," as I learn and create yummy summer meals. I'm excited to try new varieties of food and create new ideas. 

My first attempt at a yummy summer meal for the family was a complete success! It hit the spot!Creamy, flavorful, and healthy, this chicken salad was the perfect kickoff to my summer meal. This is so easy to make, and so worth the little time that it takes! My dad, who I consider the ultimate food taste-tester, couldn't get enough of the salad!

I served this delicious dish with watermelon, but I'd also suggest a side potato salad or fruit salad, yet it's satisfying enough by itself! This is also the perfect dish to bring to a summer party or picnic. 


Chicken Salad with Avocado-Herb Dressing

Makes approximately 4 servings

Ingredients:

Salad- 
4 oz of chicken breast, baked and shredded
1 up broccoli/carrot slaw( I get mine from Trader Joe's)
1 head of red leaf lettuce, chopped and washed

Dressing-  
1/2 ripe avocado
1 Tablespoon Dijon Mustard
1 Tablespoon olive oil
1/3 cup parsley
1/3 cup fresh basil
1/4 teaspoon ground black pepper
1/4 teaspoon salt


Directions:

1. Bake chicken 450 for 40 minutes.

2. While the chicken is baking, combine dressing ingredients in food processor and pulse together. If the dressing is too thick (consistency like guacamole), add more oil, a tablespoon at a time, until desired consistency is reached.  

3. Chop and wash lettuce. Set aside in serving dish

4. Once chicken is finished, take it out of the oven and shred it. 

5. Toss the shredded chicken with avocado dressing. 

6. Serve, or store in an airtight container for later

 
The chicken-avocado mix


The Chicken Salad with Watermelon