Pages

Showing posts with label {Yummy Treats}. Show all posts

Saturday, January 4, 2014

{Berry Coconut Yogurt}


I finally made coconut yogurt!!!!!!! I have been craving this stuff so long!! I used to eat coconut yogurt everyday until I cut out all grains, because the conventional companies use rice starch as a binder. Ugh! So for about 2 years, I have been craving yogurt, drooling whenever my brother eats his Yoplait, dreaming of the coconut yogurt I used to have. 


But now I've made it and the wait is over! "Yum" is not enough to describe the joy I felt when I took a savory bite of my yogurt this morning. Maybe sweet victory is closer...

Using a Christmas gift of Great Lakes grass-fed gelatin, I was finally able to make my coconut yogurt. I've been researching a lot about gelatin and how to make allergy-friendly yogurts, and this brand kept popping up. So far, my body is loving it! I also made fruit gummies the other day. They weren't as delicious as my yogurt, but they sure were a nice snacky treat. Though this yogurt doesn't have cultures (because frankly, they are way out of my budget), the gelatin is said to help digestion, along with strengthening and supporting joints. As a runner, I need all the joint support I can get! :)

Furthermore, this yogurt does not require a fancy yogurt maker. All you need is a saucepan and a food processor!  

Another thing that makes this yogurt so great is that it is sugar and sweetener free!! If you are able to have sweeteners, add a bit of honey. But if you're like me and avoiding sugar like the plague, you may just jump for joy. :)

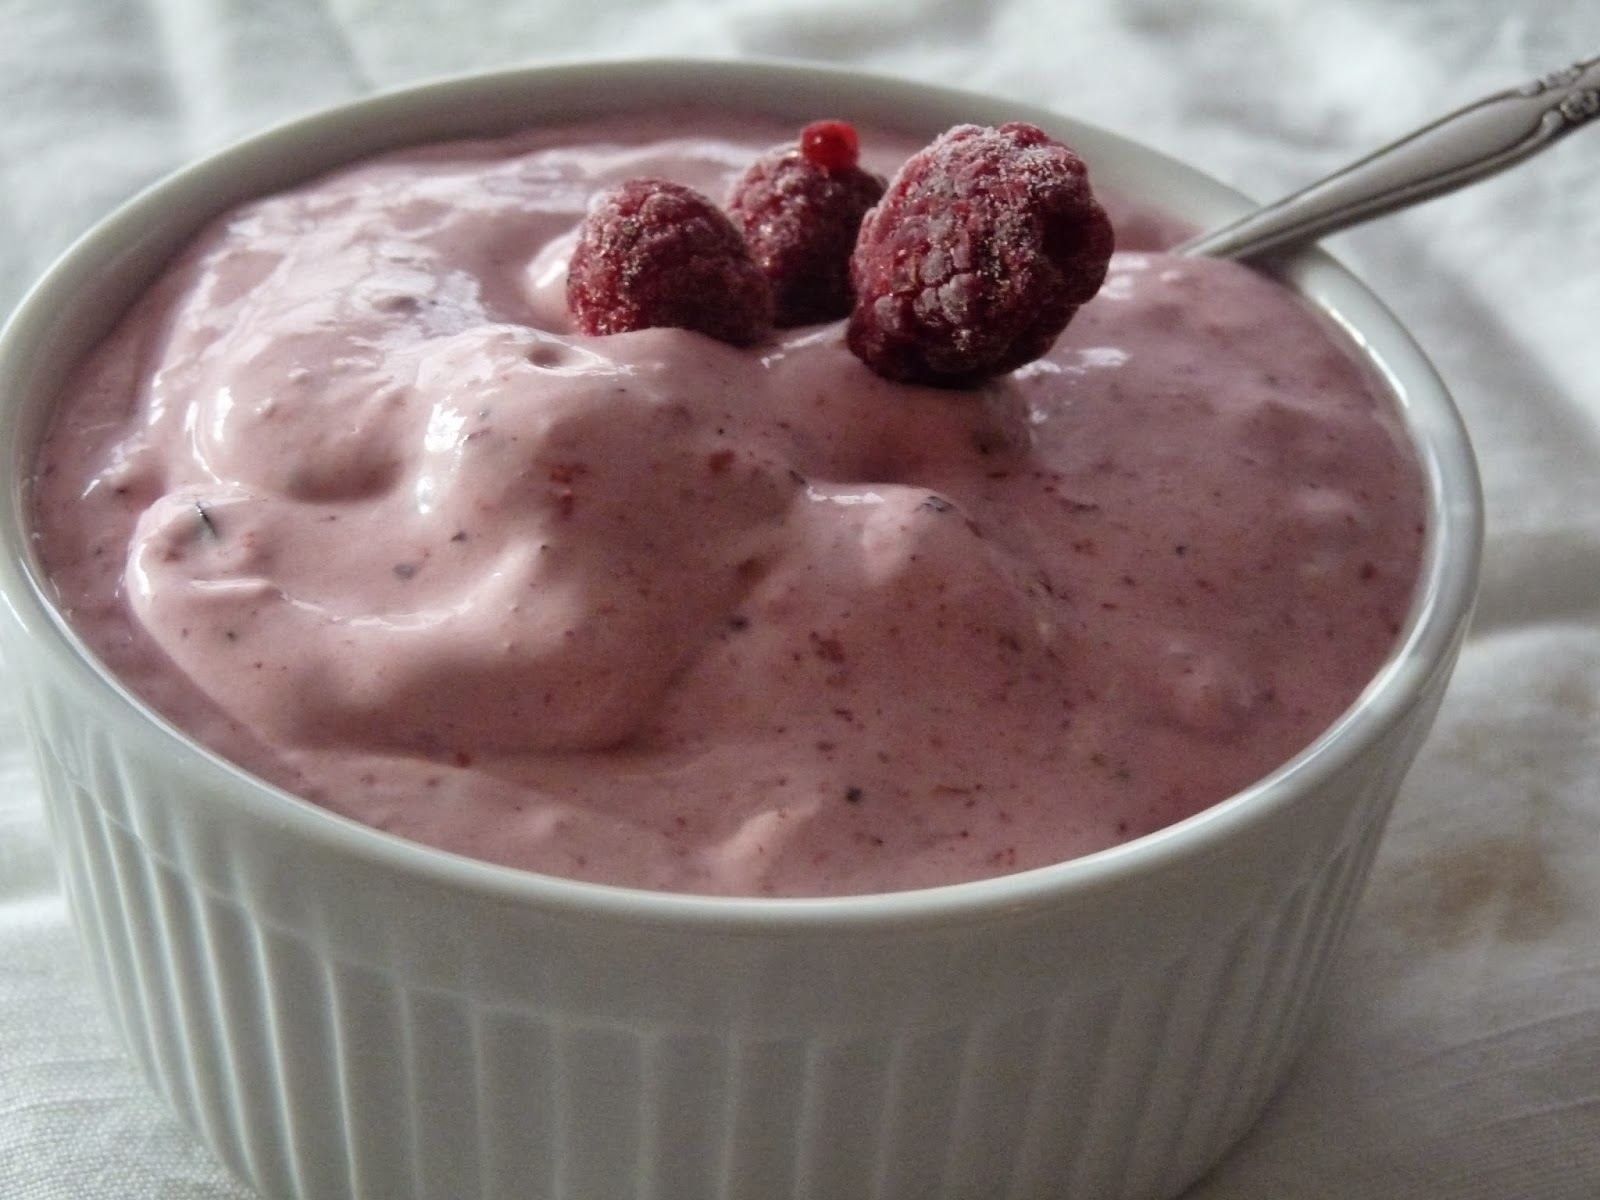
For my yogurt, I blended in berries, but you can certainly omit that step and have plain yogurt. Other options include sprinkling your favorite granola on top, making parfaits, adding a bit of vanilla extract for a vanilla version, or add some seeds and shredded coconut for an extra protein punch. Be creative- it is your grain-free, unprocessed, homemade yogurt! Be proud! :)


{BERRY COCONUT YOGURT}

for a single serving 

INGREDIENTS:
 1 cup coconut milk (I used Trader Joes' canned light coconut milk), divided
1- 1.5 teaspoons gelatin (depending on desired thickness)
Juice of 1/2 a lime 
1/4 cup berries, frozen or fresh

INSTRUCTIONS:
 
Heat 3/4 cup of the coconut milk in a small saucepan over medium-low heat. In a bowl, combine the gelatin and rest of the coconut milk (1/4 cup) until it forms a smooth paste. Add the paste and lime juice to the coconut milk in the sauce pan, constantly whisking the ingredients until they are smooth and thoroughly combined. 

Pour the coconut yogurt into a container and let it chill in the refrigerator for one hour up to overnight. 

Once chilled, place the yogurt and the berries in a food processor and blend until creamy and smooth. Serve and enjoy immediately with toppings or as is.

*If the coconut yogurt is too thick for your taste once is chilled, add water until it reaches desired consistency.  
 

Sunday, November 17, 2013

{Perfectly Pumpkin Bagels}

I am so excited to finally have a bagel recipe!!!!! Really, jumping-up-and-down excited!!!!

Bagels optimize my inner struggle with my complicated food lifestyle. For 99% of the time, I truly enjoy my diet and love making new creations loaded with vegetables and good healthy nutirents. But sometimes I just want a warm, chewy, scrumptious bagel, lathered in rich cream cheese. I can dream, can't I?

I even wrote a college essay on my "bagels" in life and in running- the time where it is tempting to give up and go for the easier and more temporarily satisfying decision instead of doing what is right for me and my training. Learning to say no to bagels. Sounds like a good book title.

Until now, every time I tried to create a bagel-type of bread, they came out mushy, doughy bites that tasted like flaxseed meal. Not the bagel I had dreamed of.

But now I can say- no,  shout YES to bagels. The secret? A little bit of tapioca starch for the  classic bagel chewiness, chia seed meal for the "egg" (I've found make chia meal "eggs" actually work better than the classic flaxseed meal egg in my baking experiments), and coconut milk for extra moisture. 


I ate mine with a little bit of Trader Joe's delicious pumpkin butter. Although I didn't try it, I thought of making a little bit of coconut whipped cream, sprinkling some cinnamon and some pumpkin butter in it to make pumpkin "cream cheese" to put on top. 
 
 I hope that you enjoy these lovely creations as much as I do!  


  {PERFECTLY PUMPKIN BAGELS}

Ingredients:

1.5 Tablespoons chia meal (chia seeds ground in a coffee grinder)
3 Tablespoons pumpkin puree
2 Tablespoons water
1 Tablespoons apple cider vinegar
3/4 teaspoon xanthan gum
 1/4 cup plus 2 Tablespoons coconut milk

1/4 cup coconut oil, melted
1/2 cup tapioca starch
1/2 cup coconut flour
1/2 teaspoon cinnamon
1/4 teaspoon nutmeg (*omit for AIP)
1/4 teaspoon ginger
1/4 teaspoon cloves
1 teaspoon baking soda
1 teaspoon baking powder (* make sure it is corn-free. Or better yet, make your own)


Instructions:

1.  Add chia seed meal, pumpkin puree, water, apple cider vinegar,xanthan gum, and coconut milk in an electric blender. In order, add coconut oil, then flours and spices, then baking soda and baking powder, scraping down the sides of the bowl as necessary. Beat until a dough-like mass begins to form.

2. Forming the dough into large balls, depending on how large you want them. I made mini bagels forming balls of dough about the size of two tablespoons. To make larger bagels, I'd suggest forming dough the size of your fist. Poke a hole in the middle of the dough ball and shape to form a bagel using dry hands. Place the bagels on a baking sheet lined with parchment paper.

3. Bake at 350 for about 20 minutes, depending on size of bagels. I made mini bagels, and cooked them for 15 minutes. Allow them to cool for at least 10 minutes before slicing. Enjoy!


Variation Ideas:

 *I will be making a few of these shortly and posting them. That said, these are just my ideas, so they haven't been proven yet. But feel free to experiment- it's fun!!!

For all recipe variation ideas, omit pumpkin puree and either replace with unsweetened applesauce or 3 Tablespoons more of coconut milk

Cinnamon Raisin- add 1/4 cup of raisins and 1/2 teaspoon more of cinnamon
Cranberry Orange- add 1/4 cup of dried cranberries (or Trader Joe's orange cranberries) with 1/2   teaspoon of orange zest
Chocolate-zucchini- Add 1/4 cup of shredded zucchini and 2 Tablespoons of cocoa powder
Chocolate chip-  add 1/4 cup of EnjoyLife mini   chocolate chips
Apple-cinnamon- increase cinnamon, add 1/4 chopped apples. 


Saturday, October 19, 2013

{Autumn Apple Pie}


I have found a new name for myself. I made up a label as "Paleo plus," since I'm Paleo plus nut-free, seed-free, egg-free, mostly potato-free. As I was browsing the web for some cooking inspiration, I came across my new name- AIP. I am following a mostly Autoimmune Protocol diet ( I do occasionally have things with tomatoes). Its so nice to have a name. 

That said, its been especially difficult to come up with some fall treats. Last weekend I tried making pumpkin bread. I failed miserably- the pumpkin bread was dry, and tasted nothing like that soothing pumpkin taste I craved. I temporarily gave up on the pumpkin bread (Don't worry, I will resume the pumpkin quest soon), and instead tried to create an absolute favorite- apple pie. 


Last night was the first night in EVER that we had a family movie night. And of course, every movie needs to be accompanied with a treat! :)

 During my desperate search for some creativity, I came across a few very helpful and creative AIP blogs. For those of you who are following AIP, or simply trying to minimize a few more things in your diet, I highly recommend that you go explore too! It can be a little overwhelming, but at the end of my hour long quest, I felt so accomplished. And, most importantly, inspired.


Back to the apple pie. Besides being super duper easy to make, it was so delicious! However I will warn you, if you're like my mom and don't like coconut, do not try this. Apparently I neglected to forewarn my mom, who asked, when tasting it "does this have coconut?" Practically the whole thing is coconut! Well, besides the apples, obviously.


If you are looking for a yummy, melt-in-your mouth, easy, allergy-friendly autumn recipe, this apple pie was made for you! The pie is gone. I made it last night, and it is gone. I may or may not have had a quarter of it... Its healthy, right? 

My suggestion for making this pie even better is to add a dollop of coconut whipped cream on top. Paleo Cupboard has a great recipe here 
 
I hope you enjoy this yummy autumn treat as much as my family did! 


{AUTUMN APPLE PIE}


INGREDIENTS:

3/4 cup coconut flour
1/3 cup plus 1 Tablespoon coconut oil
1/3 cup finely shredded coconut
pinch of salt

6 apples, sliced thinly
1/3 cup maple syrup
2 Tablespoons coconut sugar
1 1/2 teaspoons cinnamon
1/2 teaspoon ground ginger
1 teaspoon tapioca starch

Instructions:

Preheat the oven to 350 F. 

For the crust, combine the coconut flour, coconut oil, shredded coconut, and salt in a food processor, mixing until it resembles a thick paste. Spread into an 8 inch pie pan, lightly greased with coconut oil. Place in the oven for about 15 minutes, or until the crust begins to brown. 

Meanwhile, combine the apples, cinnamon, ginger, and tapioca starch in a large bowl, mixing until well-incorporated. Then, add the syrup and coconut sugar, stirring until  thorughouly mixed. 

Pour the filling mixture into the pre-baked pie crust. Place parchment paper over the pie and press a cake pan on top of the pie- this ensures that the pie bakes evenly. Bake for about an hour and 20 minutes, then remove the parchment paper and cake pan and bake for another 5 minutes. 

Remove from the oven and let it cool. If you can wait long enough and don't mind, I found that letting the pie sit and then refrigerating it really helped the pie to not crumble. Unlike a traditional pie, this tends to be a bit more tricky and crumbly. Don't cry if your piece of pie winds up looking like a cobbler- I promise, it's still yummy and it's still pie!

Serve with coconut whipped cream, coconut ice cream, sprinkle with shredded coconut, or better yet, just eat it! 


Monday, September 30, 2013

{Cranberry Orange Bread}

It is fall!!!! I'm excited to start experimenting with new recipes, cooking up some wonderful fall time classics. Especially now that I'm HALF-WAY done with college applications! Whoohoo!!!! Can you tell I'm excited? :)

Anyway, with that accomplished, I got a little relaxing time to bake. Not for me, because this recipe is not egg-free or nut-free (at least not yet. I will be attempting egg and nut free bread soon), but for my family. As I've said before, my family cannot get enough of the apple-cinnamon bread I make, so I though I'd experiment. Since we had a HUGE bag of dried cranberries, that my brother uses for making his own trail mix, I thought an orange-cranberry twist would be fun. 


Needless to say, it was a hit. Half a loaf was gone in probably ten minutes. The rest soon followed. My brother said it tasted like a bagel in that it was chewy and soft. I took that as a high compliment, coming from the world's pickiest eater ever!

Here's a picture of my brother in pure heaven. 


And another. I think I just became the best sister in the entire world right there. 


You'll notice this is basically the same recipe as the apple cinnamon bread, with a few slight variations. That said, feel free to use the framework and get creative with your own variations! I know I'll be trying a pumpkin bread and cinnamon swirl soon! :)


{CRANBERRY ORANGE BREAD}


Ingredients:

2 cups almond flour 
1/2 cup potato starch
1/2 cup tapioca starch
1/4 cup granulated sugar
1 Tablespoon xanthan gum
3/4 teaspoon salt


2 teaspoons sugar
2 1/4 teaspoons active dry yeast
1/2 cup hot water (110 F) 

1/2 cup warm almond milk (110 F)
3 eggs
3 Tablespoons olive oil

1/4 dried cranberries
1/2 teaspoon orange zest


Instructions:

Here's how I've found the most success: 

1. Preheat the oven to 325 F.  Place the almond flour in the food processor and grind about 15 seconds in order to break up clumps. Mix all the dry ingredients in a large food processor and pulse for a few seconds. Next add the orange zest and mix thoroughly.

2. Mix the yeast, sugar, and hot water in a small bowl. Mix it up gently, place a towel over the bowl, then place it in a warm and disclosed place and set a timer for 10 minutes. 

3. While waiting for the yeast, heat up the milk, bring eggs to room temperature (put them in a bowl with hot water). 

4. When there is about 30 seconds left for the yeast, mix in the warm milk, eggs, and oil. Then pour the yeast into the food processor and  mix for one minute, until a dough forms. 

5. Gently pour the bread into the loaf pan, then carefully fold in the cranberries. 

6.   Bake for 45 minutes, or until done (to test with a toothpick, poke it in the center of the bread. If the tooth pick is clean, it its done. If it has dough on it, set the timer for another 5 minutes and check again). 

7. Let cool for 20 minutes, then slice and serve. 


~I hope you enjoy this fall treat as much as my family does!


Sunday, September 29, 2013

{Coconut Cobbler}

Three day weekends are seriously the best. I just need that one extra day to catch up and sort of have an opportunity to relax before the whirlwind of life begins again. However, I'm usually terrible about relaxing and using that extra day to do something fun. But this time I did it. My friend Maddie came over and we continued our tradition of making coconut cobbler. First, before I tell you how incredible coco cobbler, as we nicknamed it, is, let me tell you the background story of this magnificent creation. 


Last year during the cross country season, Maddie invited me over to her house to cook me a meal. Now, as a person with many allergies and severe consequences following contamination, I don't let anybody cook my food. Not even my mother! So Maddie, being the amazing friend she is, decided I needed to face my fears in her very clean, Italian,  and "safe" kitchen. First, we made a kelp noodle stir fry with turkey meat, which was delicious. And safe. Then we experimented with a "dessert," since no Italian meal is complete without sweets. 
 
{Maddie enjoying our Coconut Cobbler}


And thus emerged Madney's Coco Cobbler, the most delicious dessert in the entire world.  Seriously, we are obsessed with this stuff! Gooey, moist, and delicious, and topped with fresh fruit and coconut sugar, this is a treat that you can feel good about eating.  Whenever I finish eating it, I feel like I could die and go to heaven well content. When you make this, be sure you only make as much as you can still maintain self control- yes, its that tempting!


Now back to the coconut sugar. Maddie and I go nuts over this stuff. I know, it sounds weird, but the only way I can think to describe it is like brown sugar meets maple sugar, but richer and better. Anyway, its delicious, and good for you. Coconut sugar is low glycemic, only a 35 on the glycemic index, which is good news for me, since I have a very low tolerance to sugar (even certain fruits make me sick!). I'll admit, I have eaten coconut sugar by itself- its THAT good!!! Maddie even bought me my own coconut sugar for my birthday! 


I promise this is worth your while. It is easy, simple, and delicious! Making coconut cobbler is not only fun, but a great social opportunity, whether you make it with friends, siblings, or kids. I hope you begin your own coconut cobbler traditions of your own!

{COCONUT COBBLER}

 Serves 2
Ingredients:

4 Tablespoons coconut flour
*2 flax "eggs" 
1/4 teaspoon cinnamon
1 Tablespoon coconut sugar
1/4- 1/3 cup of water

Instructions:
 Preheat the oven to 375 degrees.

Mix coconut flour, flax "eggs," cinnamon, coconut sugar together in a medium sized bowl. Add the water, beginning with 1/4 cup, and slowly adding more while mixing until it reaches a doughy consistency. 

Spoon the batter into mini loaf pans, a small cobbler bowl, or muffin tins and bake for 20-25 minutes, until cooked through and firm.

Carefully divide the cobbler into bowls and top with fruit, jam, coconut sugar, extra cinnamon- get creative


*Flax eggs: for the equivalent of one egg, mix 1 Tablespoon of flax meal and 3 Tablespoons of warm water, then let it set for 10 minutes


Saturday, August 3, 2013

{Cinnamon Apple Bread}

I'm so glad I am finally posting this. This is BY FAR my best creation yet. It has taken me months to perfect, but it is so worth it! Presenting, the most delicious cinnamon apple bread in the world:


This thing gets gobbled up in our house! My mom makes french toast, my dad eats it as toast, and my brother, well, he just eats it. Seriously, I just made it yesterday, and it is already half-gone! I guarantee by tonight, there will be one piece left.


In order to get this bread looking as marvelous as it tastes, it was quite a journey! When I first started making this bread, it would have a marvelous rise in the oven, then completely collapse, making for a very dense bread. It still tasted good, but it wasn't what I wanted it to be. So I experimented with it cooling on its side, reducing the liquid,  reducing the oven temperature, even experimenting the differences between mixing it in a food processor and a standard mixing bowl.

Don't be disappointed if your first attempt at this causes you to end up with falling bread. It has taken me many tries, but it is so worth it. And I promise, whether it looks lovely or not, this bread will impress your taste buds! Enjoy!!


**Make sure to read through the instructions a few times before you start. It may seem tedious, but it may mean the difference between fallen bread and true, fluffy bread.

{CINNAMON APPLE BREAD}

Ingredients:
 
2 cups almond flour 
1/2 cup potato starch
1/2 cup tapioca starch
1/2 cup granulated sugar
1 Tablespoon xanthan gum
3/4 teaspoon salt

2 teaspoons sugar
2 1/4 teaspoons active dry yeast
1/2 cup hot water (110 F) 

1/2 cup warm almond milk (110 F)
3 eggs
3 Tablespoons olive oil

1/2 of a large apple, diced
1/4 cup brown sugar
3/4 teaspoon cinnamon


Instructions:

Here's how I've found the most success: 

1. Preheat the oven to 325 F.  Place the almond flour in the food processor and grind about 15 seconds in order to break up clumps. Mix all the dry ingredients in a large food processor and pulse for a few seconds.

2. Dice 1/2 of the apple, then add it to the sugar and cinnamon mixture.

3. Next,  mix the yeast, sugar, and hot water in a small bowl. Mix it up gently, place a towel over the bowl, then place it in a warm and disclosed place and set a timer for 10 minutes. 
 
4. While waiting for the yeast, heat up the milk, bring eggs to room temperature (put them in a bowl with hot water). 

5. When there is about 30 seconds left for the yeast, mix in the warm milk, eggs, and oil. Then pour the yeast into the food processor and  mix for one minute, until a dough forms. 

6. Gently pour the bread into the loaf pan, then gingerly fold in the apple mixture. 

7.   Bake for  50 minutes, or until done (to test with a toothpick, poke it in the center of the bread. If the tooth pick is clean, it its done. If it has dough on it, set the timer for another 5 minutes and check again). 

ENJOY!!!!!!! :)


Saturday, June 15, 2013

A Sprouting Summer- Mint Chip "Ice Cream"

 Since it is summer, many Paleo and allergy-free people alike dread the hot days without the comfort of ice cream, frozen yogurt, berry pies, and such. For us, we resolve to our frozen mangoes and cool cucumbers for a summer treat. But no longer do we have to watch in disdain as our friends eat that frozen temptation, for here is one of the most spectacular things I have ever made: ALLERGY- FRIENDLY MINT CHIP ICE CREAM!! With the main ingredient as hemp seed, you may be thinking, Ha! this isn't ice cream. How do you get creamy deliciousness from a small hippie delicacy? Yes, it sounds strange, but the taste and texture are enough to knock the socks off of any skeptics' feet.


This is seriously the best ice cream EVER! Even better than the sugar-filled, dairy, real-deal stuff. I'm not exaggerating. It is so addicting! I had some after dinner last night. An added bonus to this recipe- its SUPER DUPER easy!!! Literally, just blend hemp seeds, add coconut milk, honey, peppermint extract, chocolate chips, blend some more, and stick it in an ice cream maker. It's that simple!

With enough allergies and sensitivities to cause someone a headache, I often have a hard time finding staples, such as chocolate. However, Enjoy Life produces some amazing chocolate chips, along with chocolate bars. With a slogan that boasts that their products are "free of the top 8 allergens," these Enjoy Life products are enough to make someone like me jump for joy. And might I add, the chocolate chips are delicious. Since this ice cream recipe only requires 1/4 cup of the chocolate chips, use the rest to make cookies, top the ice cream, or better yet, eat by themselves! :) 

Hemp seeds, since they are usually associated with clothing material for hippies and hipsters alike, can be an odd thing to eat with that in mind. However, despite their tattered past, these seeds are health bombshells, packed with essential fatty acids, including healthful omega-6. With a nutrient- packed seed like this in your frozen treat, you can now have your ice cream and eat it too!


{The Most Wonderful Mint Chocolate Chip Ice Cream}


Ingredients:
1/2 cup hemp seeds
1 can or 13 ounces of coconut milk
1/3 cup honey
1 teaspoon peppermint extract
1 Tablespoon allergy freindly vanilla extract*
1/4 cup chocolate chips

Directions:

Blend hemp seeds for 30 seconds in a blender. Add coconut milk, honey, and extract(s), and chocolate chips until the chips are broken into pieces. Add the liquid to the ice cream maker and follow manufacturer instructions. 


ENJOY!


* A note on vanilla extract: I've yet to find a vanilla that either doesn't derive its "vanilla" from corn or chooses to outline all of its ingredients. Though vanilla extract seems harmless, its mysteries could prove to be devestating to the unsuspecting eater. Therefore, your best bet, if you are trying to stay away from allergens, is to either make your own extract, or omit it all together (I often choose the latter).