Pages

Showing posts with label {Sugar Free}. Show all posts

Monday, February 17, 2014

{Spaghetti Squash Shrimp Creole}

 Happy Monday everybody! It is a beautiful day, and even more beautiful because there is no school this week. That means I get to catch up on some homework, prepare for track season, and COOK! 

I have been so inspired by all the 21 Day Sugar Detox and Whole 30 recipes that are circulating the internet. That said, after trying to figure out what to do for dinner with an end-of-the-week refrigerator and a spaghetti squash, I decided on this spicy seafood delicacy. 


This is definitely my new favorite way to eat spaghetti squash. I love all things with tomato, and this is certainly no exception. It is really easy to make, and a delicious creation. I only made enough for myself, but this recipe is easily adjustable to an amount to feed more mouths. Simply increase ratio if cooking this for more than one serving or for making more than one batch.

One of my favorite parts of this recipes it that I have another excuse to use more bone broth. It is so yummy and so good for my health. I have added it as a regular part of my Paleo plus/21DSD/Whole 30 lifestyle. I have seen significant improvement in my health since  following a 21 DSD and Whole 30 diet for about 3 months. I'll admit, I do sometimes eat more fruit than I should- which is still only two servings in a day instead of the usual five servings per week. With so many vegetables and healing recipes, I feel so energized, healthy, and great. This shrimp creole is a new staple in my favorite recipes!

I hope you enjoy this yummy seafood delight!


 {Spaghetti Squash Shrimp Creole}

Serves 1
 Ingredients:
 1/2 spaghetti squash, baked
1 teaspoon coconut oil
1/2 cup green pepper, chopped
1/4 cup celery, chopped
1 garlic clove, minced or pressed
1/2 teaspoon oregano
1/2 teaspoon paprika
1/4 teaspoon homemade taco seasoning

1/2 cup bone broth or chicken broth
4 ounces tomato paste
3 ounces cooked shrimp

Instructions:

1. Begin by baking the spaghetti squash, cut in half and with seeds removed, at 375 F for 35 minutes.
2. While the spaghetti squash is baking, heat coconut oil in a non-stick pan. Add green pepper and celery. Saute until softened, about 5 minute. 
3. Next, add the tomato paste, bone broth, paprika, oregano, taco seasoning, and garlic to the pan, mixing thoroughly. Cover the pan and allow to simmer for 20-30 minutes. If you desire a thinner sauce, add water or more broth. If you like a thicker sauce, add coconut flour, a teaspoon at a time.
4. Remove the baked spaghetti squash from the oven and "spaghetti" it with a fork. Put the spaghetti in the pan, mixing to coat with the sauce.
5.  Finally, add the prepared shrimp and let it all cook together for at least 5 minutes.
6. Serve and enjoy!


Saturday, January 4, 2014

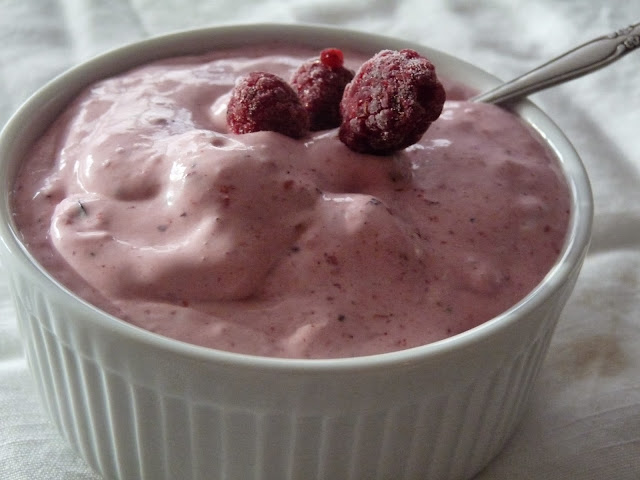
{Berry Coconut Yogurt}


I finally made coconut yogurt!!!!!!! I have been craving this stuff so long!! I used to eat coconut yogurt everyday until I cut out all grains, because the conventional companies use rice starch as a binder. Ugh! So for about 2 years, I have been craving yogurt, drooling whenever my brother eats his Yoplait, dreaming of the coconut yogurt I used to have. 


But now I've made it and the wait is over! "Yum" is not enough to describe the joy I felt when I took a savory bite of my yogurt this morning. Maybe sweet victory is closer...

Using a Christmas gift of Great Lakes grass-fed gelatin, I was finally able to make my coconut yogurt. I've been researching a lot about gelatin and how to make allergy-friendly yogurts, and this brand kept popping up. So far, my body is loving it! I also made fruit gummies the other day. They weren't as delicious as my yogurt, but they sure were a nice snacky treat. Though this yogurt doesn't have cultures (because frankly, they are way out of my budget), the gelatin is said to help digestion, along with strengthening and supporting joints. As a runner, I need all the joint support I can get! :)

Furthermore, this yogurt does not require a fancy yogurt maker. All you need is a saucepan and a food processor!  

Another thing that makes this yogurt so great is that it is sugar and sweetener free!! If you are able to have sweeteners, add a bit of honey. But if you're like me and avoiding sugar like the plague, you may just jump for joy. :)

For my yogurt, I blended in berries, but you can certainly omit that step and have plain yogurt. Other options include sprinkling your favorite granola on top, making parfaits, adding a bit of vanilla extract for a vanilla version, or add some seeds and shredded coconut for an extra protein punch. Be creative- it is your grain-free, unprocessed, homemade yogurt! Be proud! :)


{BERRY COCONUT YOGURT}

for a single serving 

INGREDIENTS:
 1 cup coconut milk (I used Trader Joes' canned light coconut milk), divided
1- 1.5 teaspoons gelatin (depending on desired thickness)
Juice of 1/2 a lime 
1/4 cup berries, frozen or fresh

INSTRUCTIONS:
 
Heat 3/4 cup of the coconut milk in a small saucepan over medium-low heat. In a bowl, combine the gelatin and rest of the coconut milk (1/4 cup) until it forms a smooth paste. Add the paste and lime juice to the coconut milk in the sauce pan, constantly whisking the ingredients until they are smooth and thoroughly combined. 

Pour the coconut yogurt into a container and let it chill in the refrigerator for one hour up to overnight. 

Once chilled, place the yogurt and the berries in a food processor and blend until creamy and smooth. Serve and enjoy immediately with toppings or as is.

*If the coconut yogurt is too thick for your taste once is chilled, add water until it reaches desired consistency.